Matlab : GUI

This chapter will discuss about using Matlab fuzzy toolbox. Suppose you already have data and want to process the data using fuzzy. In general, you should follow this block diagram.

Data -> Pre process -> Decision Function

To start the tutorial, we will create simple GUI to simplify our work.

Write guide command in command window and save it. It will create two files which are one .m file and one .fig file. For example we save with name “Workshop2” so it will create two file Workshop2.fig and Workshop2.m in your folder.

> guide

untitled-1

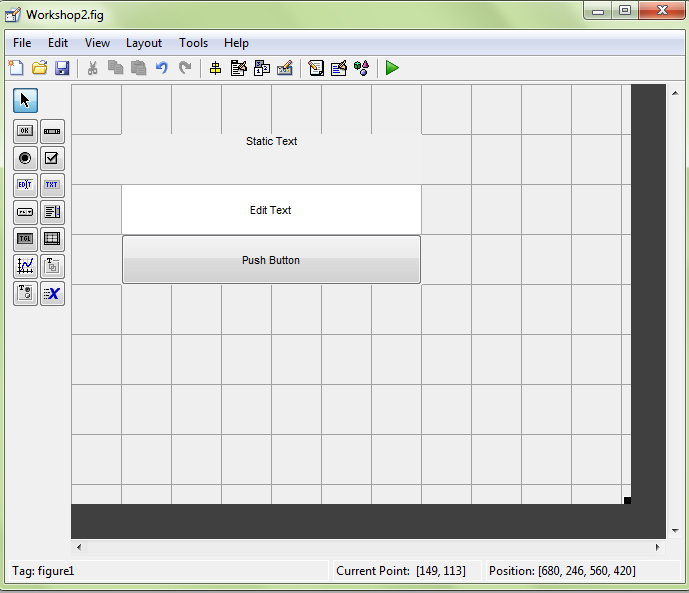
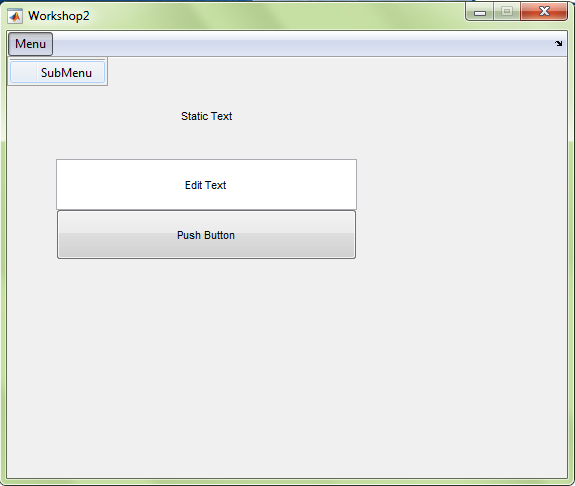
Drag the Edit Text, Static Text, and Push Button on the left to the figure. The appearance become like this.

untitled-21

Now we will learn how to get input from Edit Text when we push the Push Button.

Go to your Push Button code in Workshop2.m and write this code.

untitled-33

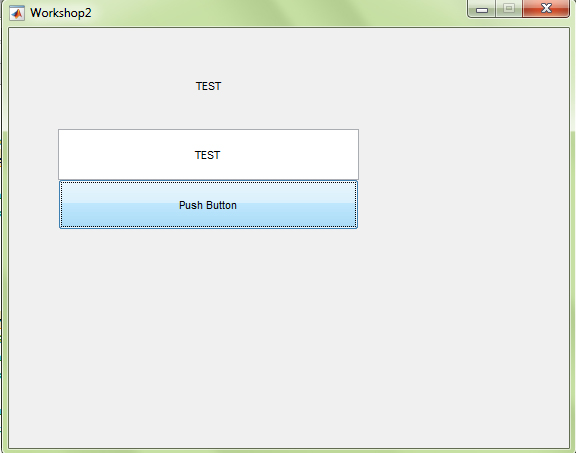
Now run the figure and write anything in the Edit Text. For example we write “TEST” in the Edit Text and press the Push Button then the text will show in Static Text as “TEXT”.

untitled-31

Now we will use custom function in the GUI. This function will detect odd or even based on the input value in Edit Text and show it on Static Text.

function result = detectoddeven(input)

if (mod(input, 2) == 0)

result = ‘EVEN’;

else

result = ‘ODD’;

end

end

Save it to detectoddeven.m and in the Workshop2.m under Push Button section we write this code.

untitled-35

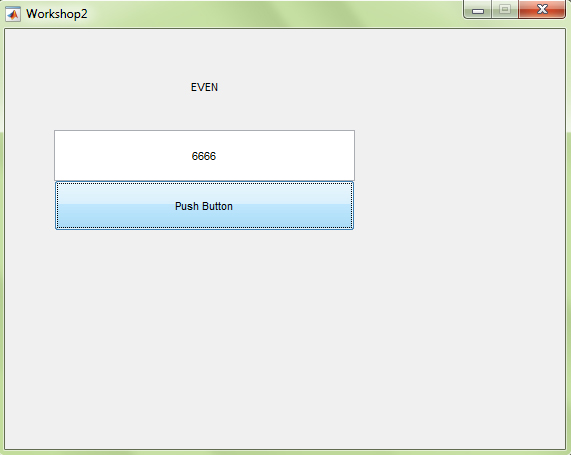
If we run the program and set input with value 6666, the program will detect the value as “even”

untitled-34

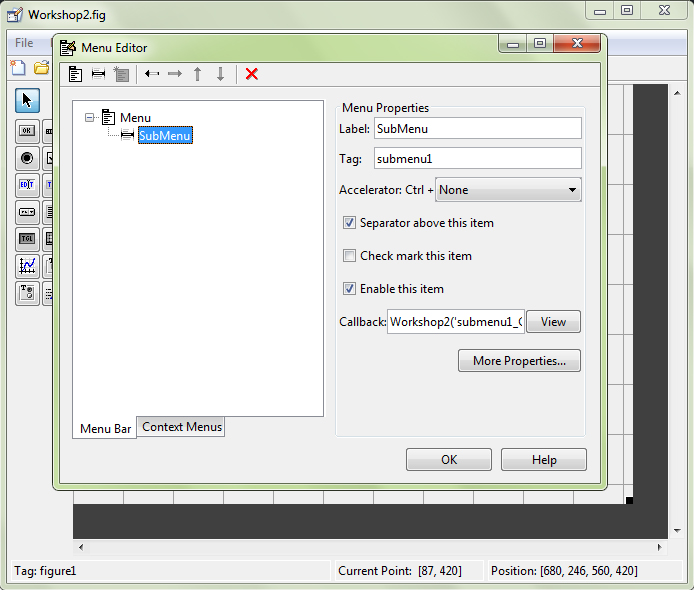
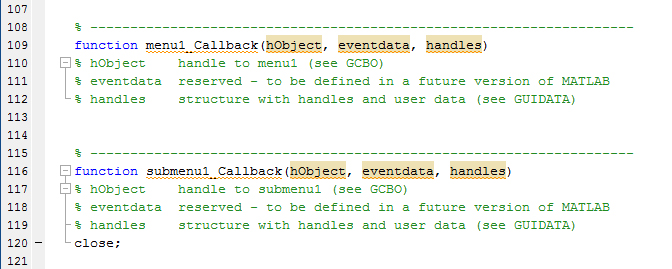
Now we want to create menu in the GUI using menu editor.

untitled-38

We will create if Menu -> SubMenu is clicked then the GUI will close with this code

untitled-37

And the result

untitled-36

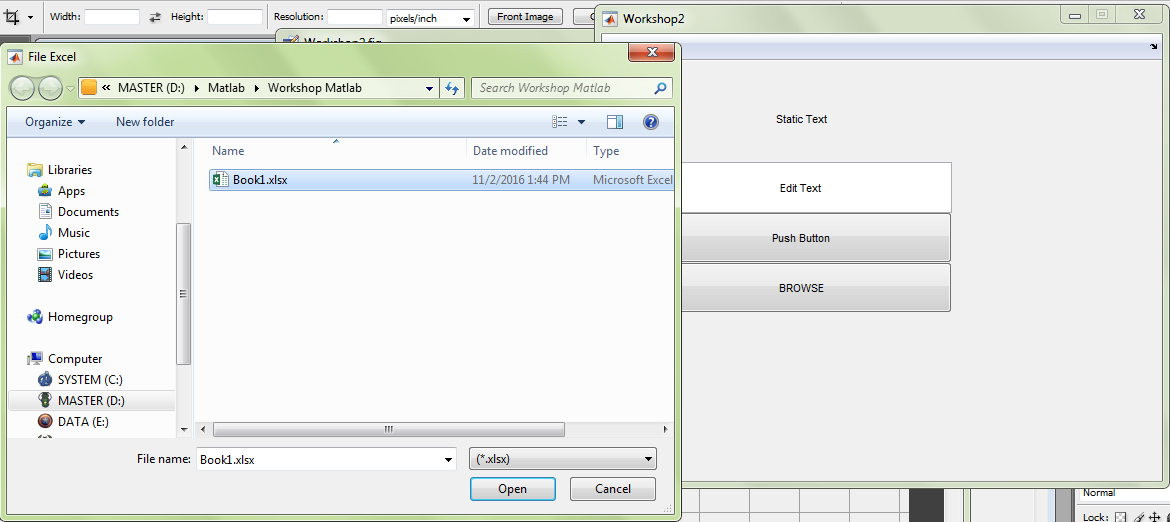
We want to browse through the explorer and get an item from it to show the filename on Static Text. First we create one more push button and name it “BROWSE” and in the Workshop2.m under pushbutton2 section we add this code

untitled-39

And the browse dialog will be

untitled-40

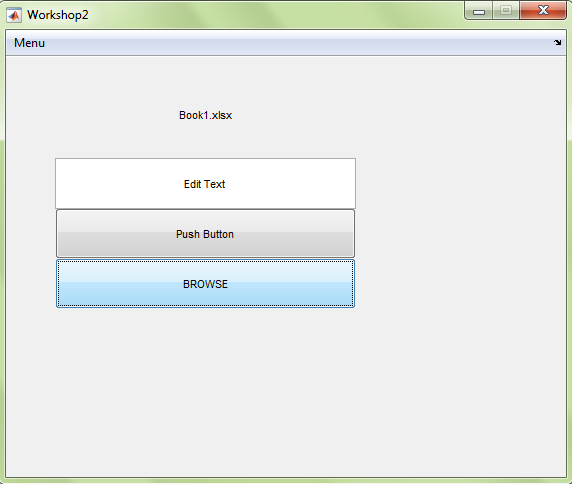
When we choose a file and click Open then the filename will be shown in Static Text

untitled-41


Matlab : Graphs

This chapter will explain common plot function in Matlab. To draw graphics in Matlab we can use plot() function as defined below:

Syntax :

x = -pi:pi/10:pi;
y = tan(sin(x)) – sin(tan(x));
plot(x,y,’–rs’,’LineWidth’,2, ‘MarkerEdgeColor’,’k’, ‘MarkerFaceColor’,’g’, ‘MarkerSize’,10);

Where :

x is the axis range

y is the result

‘–rs’ is the line model which is double strip –, “r” for red color and “s” for square marker

‘LineWidth’ determines the line width which is 2

‘MarkerEdgeColor’ determines the marker edge color which is ‘k’ for black color

‘MarkerFaceColor’ determines the marker face color which is ‘g’ for green color

‘MarkerSize’ determines the marker size which is 10

Result :

untitled-5


To add two graphics in Matlab we can use plot() function followed by hold on and hold off as defined below:

Syntax : 

x = linspace(0,2*pi,60);
a = sin(x);
b = cos(x);
plot(x,a+b);

hold on
stem(x,a,’b’);
stem(x,b,’r’);
hold off

Result :

untitled-6


To add title and axis label we can use title() and axes([xmin xmax ymin ymax])

Syntax :

x = [1 3 0.5 2.5 2];
pie(x);

explode = [0 1 0 0 0];
pie(x, explode);

title(‘Pie Demo’);

Result :

untitled-7


To draw 3D graphics we can use meshgrid()

Syntax :

[x,y] = meshgrid(-8:0.5:8);
R = sqrt(x.^2 + y.^2) + eps;
Z = sin(R)./R;

mesh(Z);

Result :

untitled-8


To show some graphics in one figure we can use subplot() function

Syntax :

n = 0:0.5:2*pi;
x = cos(n);
y = sin(n);

hold on
subplot(2,1,1); plot(n,x);
title(‘cosinus n’);
xlabel(‘number of samples’);
ylabel(‘value’);
subplot(2,1,2); plot(n,y);
title(‘sinus n’);
xlabel(‘number of samples’);
ylabel(‘value’);
hold off

Result :

untitled-9


Matlab : Matrix

In this chapter


Matrix Declaration

If we have matrix x = [1 2 3

4 5 6]

In Matlab, matrix’s column is separated with comma “,” or space ” ” and the row is separated with semicolon “;”

Syntax :

>> x = [1, 2, 3; 4 5 6;]

Result :

x =

1 2 3
4 5 6


Indexing a matrix

Matrix in Matlab is constructed row wise as shown below :

Suppose we have matrix A = [1, 2; 3, 4]. So the index will be:

A(1) will address to 1

A(2) will address to 2 not 3

A(3) will address to 3 not 2

A(4) will address to 4


Get element matrix

The element of a matrix 2D is in A(index of row, index of column) and for matrix 3D is A(index of row, index of column, index of dimension) and so on.

Suppose we have matrix B = [4, 2, 5; 7, 8, 11; 2, 0, 9]. So to get 0 we use B(3, 2)


Get sub matrix

To extract sub matrix from a matrix we can use interval as defined below :

Suppose we have matrix C = [1, 2, 3; 4, 5, 6; 7, 8, 9]. To extract the second row from matrix C we use :

subC = C(2,:); or C(2,1:3);

The colon operator means interval (see for loop in previous chapter) so if we write 1:3 then it means 1 to 3.

To extract 5, 6, 8, 9 we can use

subC = C(2:3, 2:3);


Special matrix function

Matlab provides a function to generate matrix with predefined value :

D = zeros(3, 3);

That syntax will create matrix D with size 3×3 and 0 for all its element

The other function is ones(m, n), eye(n), etc


Matrix operation

The operator + (addition), – (subtraction), * (multiply), / (divide) can also be used in matrix.

Suppose we can use + in A + B where A and B is matrix to perform addition matrix A and B

The multiply “*” operator performs normal matrix multiplication but if we add dot in front of the operator, it will perform element wise operation.

Suppose we have two matrix A and B and perform element wise multiplication on them

C = A .* B (element wise multiplication)


find() function

The find() function is useful for extracting value in the matrix which match the given condition.

Suppose we have matrix A = [1, 2, 3; 4, 5, 6; 7, 8, 9] and we want to find any value in the matrix which larger than 5.

>> find(A > 5)

ans =

3
6
8
9

The find() function return linear index of the matrix which contain the result of condition. As in the example the index value is A(3) = 7, A(6) = 8, A(8) = 6, A(9) = 9


reshape() function

Matrix dimension can be manipulated using reshape() function. For the example :

Suppose we have matrix 3 x 3 in A = [1, 2, 3; 4, 5, 6; 7, 8, 9] and we want to reshape the matrix into 1 x 9. We can use :

reshape(A, 1, 9)

where A is the matrix, 1 is the number of row and 9 is the number of column


min() and max() function

To extract minimum value or maximum value of matrix we can use min() and max() function. As default Matlab return the minimum or maximum value in column wise so the value is the minimum or maximum from every column


Saving matrix into Excel format

We can use xlsread() and xlswrite() to read excel data and write matlab data to excel format

[numeric, text, raw] = xlsread(file, sheet, range);

We can define the output as numeric or text or raw which extract all information in the excel

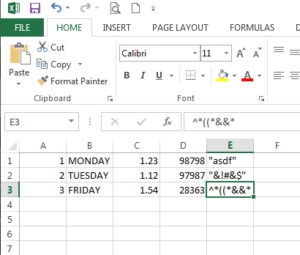
Suppose we have excel file :

untitled-2

Syntax :

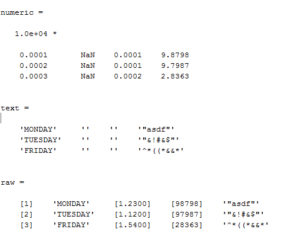
[numeric text raw] = xlsread(‘Book1.xlsx’,’Sheet1′);

Result :

untitled-3

To extract specific range from the excel sheet we can provide the third input parameter. Suppose we want to extract data from A1 to A3 so we can write :

[numeric text raw] = xlsread(‘Book1.xlsx’,’Sheet1′,’A1:A3′);

Write data to excel

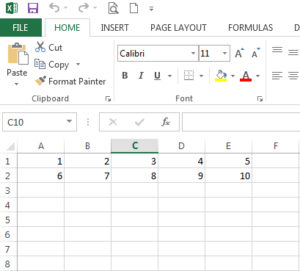
Suppose we have matrix A = [1, 2, 3, 4, 5; 6, 7, 8, 9, 10]. We can write the matrix into excel format. From this example we will write matrix A into Sheet2 in our excel file

Syntax :

A = [1,2,3,4,5;6,7,8,9,10];
xlswrite(‘Book1.xlsx’,A,’Sheet2′);

Result : 

untitled-4


Saving matrix into .mat


Matlab : Looping

This chapter will cover the use of common syntax for looping in MATLAB such as for and while.


For Loop

This is an example how to use “for” loop in MATLAB. We define the number iteration as n = 3 and update the value of f = 1 in each iteration with f * i where i is the iteration index. The value of f from each iteration will be displayed in the command window with disp() function.

Syntax :

n = 3;

f = 1;

for i = 1:n

f = f * i;

disp(f)

end

Result :

>>

1

2

6


While Loop

This is an example how to write “while” loop in MATLAB. From this example, we set i as 3 and decrease its value as long its larger than 0. The disp() function will show the updated value of i along time.

Syntax :

% while loop

i = 3;

while (i>0)

disp(i)

i = i – 1;

end

Result:

>>
3

2

1

Image Processing : Acquisition with OpenCV Part I

I assume that you already configure your project in Visual Studio C++ with OpenCV from the previous tutorial here.

Before manipulating digital image or video, we need to read the input which obtained from optical device. OpenCV make this acquisition easier. But first we need to make an OpenFileDialog class to browse the file we want.


Create a File Browser in C++

First create OpenFileDialog.h and OpenFileDialog.cpp in your Visual Studio project.

open-file-browser

Write this code in OpenFileDialog.h

#pragma once
#include <Windows.h>
#include <Commdlg.h>
#include <tchar.h>
class OpenFileDialog
{
public:
TCHAR* DefaultExtension; ///< Default extension
TCHAR* FileName; ///< File name
TCHAR* Filter; ///< Filter file type
TCHAR* Title; ///< GUI title
TCHAR* InitialDir; ///< Initial directory
int FilterIndex; ///< Filter index
int Flags; ///< Flag, true if file is open
HWND Owner; ///< Window handle
/** Open file */
OpenFileDialog(void);
/** Show GUI */
bool ShowDialog();
};

Write this code in OpenFileDialog.cpp

#include “OpenFileDialog.h”
// Open file
OpenFileDialog::OpenFileDialog(void)
{
this->DefaultExtension = 0;
this->FileName = new TCHAR[MAX_PATH];
this->Filter = 0;
this->FilterIndex = 0;
this->Flags = OFN_PATHMUSTEXIST | OFN_FILEMUSTEXIST;
this->InitialDir = 0;
this->Owner = 0;
this->Title = 0;
}
// Show GUI
bool OpenFileDialog::ShowDialog()
{
OPENFILENAME ofn ;
ZeroMemory(&ofn, sizeof(ofn));
ofn.lStructSize = sizeof(ofn);
ofn.hwndOwner = this->Owner;
ofn.lpstrDefExt = this->DefaultExtension;
ofn.lpstrFile = this->FileName;
ofn.lpstrFile[0] = ‘\0’;
ofn.nMaxFile = MAX_PATH;
ofn.lpstrFilter = this->Filter;
ofn.nFilterIndex = this->FilterIndex;
ofn.lpstrInitialDir = this->InitialDir;
ofn.lpstrTitle = this->Title;
ofn.Flags = this->Flags;
GetOpenFileName(&ofn);
if (_tcslen(this->FileName) == 0) return false;
return true;
}

Now in your main program write this code, for example in your MainProgram.cpp this are the headers that will be used:

#include <Windows.h>
#include <string>
#include <opencv\cv.h>
#include <opencv\highgui.h>
#include “OpenFileDialog.h”
using namespace std;
using namespace cv;

We will wrap up that class on simple Open() function that return path to any file we choose.

/** Open File */
string Open(string paths)
{
string path = “”;
TCHAR* initDir = new TCHAR[paths.size() + 1];
initDir[paths.size()] = 0;
copy(paths.begin(), paths.end(), initDir);
OpenFileDialog* openFileDialogs = new OpenFileDialog();
openFileDialogs->FilterIndex = 1;
openFileDialogs->InitialDir = initDir;
openFileDialogs->Title = _T(“Open image file”);
if (openFileDialogs->ShowDialog())
{
wstring arr_w(openFileDialogs->FileName);
string arr_s(arr_w.begin(), arr_w.end());
path = arr_s;
}
return path;
}

Read Image

OpenCV can read many types of image such as .jpg, .bmp, .png, etc. This code shows how you open file browser and read an image with OpenCV.

int main(int argc, char** argv)
{
Mat image; // create matrix container for image
string path = Open(“”); // get path image
if (path != “”) // check if path is empty
{
image = imread(path, 1); // read image from path
imshow(“Preview Image”, image); // show image to the screen
cvWaitKey(0); // wait any key pressed to continue
}
image.release(); // do not forget to release what you have created
return 0;
}

Read Video
OpenCV can also read file video format. This code shows how to open file video and play it using OpenCV.

int main(int argc, char** argv)
{
VideoCapture video; // memory container for video
Mat frame; // matrix container for frame
int nFrame; // number of frame
int frameRate; // frame rate
double fps; // frame per second
bool status; // status if capture is vaild
string path = Open(“”); // open file video
if (path != “”) // check if path is empty
{
video = VideoCapture(path); // load video from path to memory
if (video.isOpened()) // check if video is valid
{
fps = video.get(CV_CAP_PROP_FPS); // get frame per second from the video
nFrame = (int)video.get(CV_CAP_PROP_FRAME_COUNT); // get number of frame
frameRate = 1000 / fps; // set frame rate
status = video.set(CV_CAP_PROP_POS_FRAMES, 1); // go to frame 1
while (status == true) // check if status is true
{
video >> frame; // begin grab frame by frame along with the loop iteration
if (frame.empty() == false) // check if grab frame is succeed
{
imshow(“Preview Video”, frame); // show frame video on the screen
if (cvWaitKey(frameRate) == 32) // check if user press ‘esc’
status == false; // end the loop
}
else
status == false; // end the loop
}
}
}
// release after memory is not used
frame.release();
video.release();
return 0;
}

Read Webcam 

This code shows how to read webcam.

// read webcam
int main(int argc, char** argv)
{
VideoCapture webcam; // memory container for webcam stream
Mat frame; // matrix container for frame
bool status; // status looping
// capture webcam index 0
// if we have 2 webcam, then the index will be 0 or 1
webcam = VideoCapture(0);
if (webcam.isOpened()) // check if webcam is valid
{
int keyCode = 1; // key to end the loop
// set frame width from webcam stream
webcam.set(CV_CAP_PROP_FRAME_WIDTH, 640);
// set frame height from webcam stream
webcam.set(CV_CAP_PROP_FRAME_HEIGHT, 480);
// begin looping until user press ‘esc’
while (keyCode != 32)
{
webcam >> frame; // grab frame from webcam stream
if (frame.empty() == false) // check if frame is valid
{
imshow(“Preview Webcam”, frame); // show frame on the screen
keyCode = cvWaitKey(1); // give a miliseconds gap between frame
}
}
}
// release every memory
frame.release();
webcam.release();
return 0;
}
 

Done! There was some basic acquisition in OpenCV.


Image Processing : Configure Visual Studio with OpenCV

I assume you have compiled OpenCV 2.4.10 library with GPU support from the last tutorial or install OpenCV 2.4.10 in your machine. We will use Visual Studio 2010 C++ or any Visual Studio C++ you have. Before starting, you need to configure your Visual Studio project to know where you put OpenCV or additional library such as CUDA, OpenNI, and PrimeSense NITE.

  • CUDA is required for OpenCV GPU module (you can ignore it if you do not have NVidia graphics card in your machine).
  • OpenNI and PrimeSense NITE are required for ASUS XTion Pro Live and Kinect (you can ignore it if you do not have ASUS XTion Pro Live or Kinect).

So CUDA, OpenNI, and PrimeSense NITE act as additional requirement and can be ignored if you don’t need them. Here is the configuration:


Create Empty Project in Visual Studio

  • Open Visual Studio 2010.
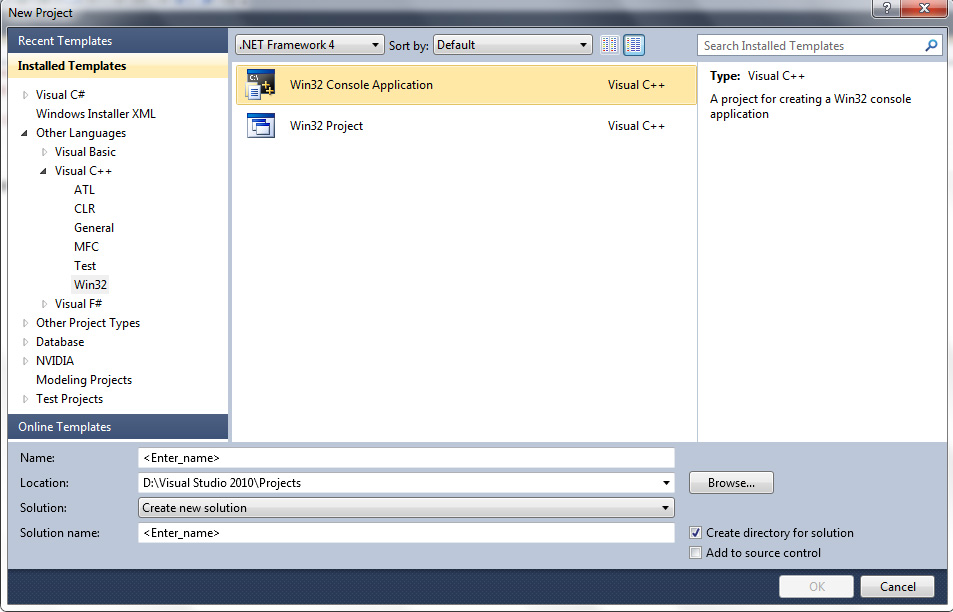
  • Create a C++ project and select Win32 console application.
  • Give a name to the project (without space or characters) then click OK.

vs-solution

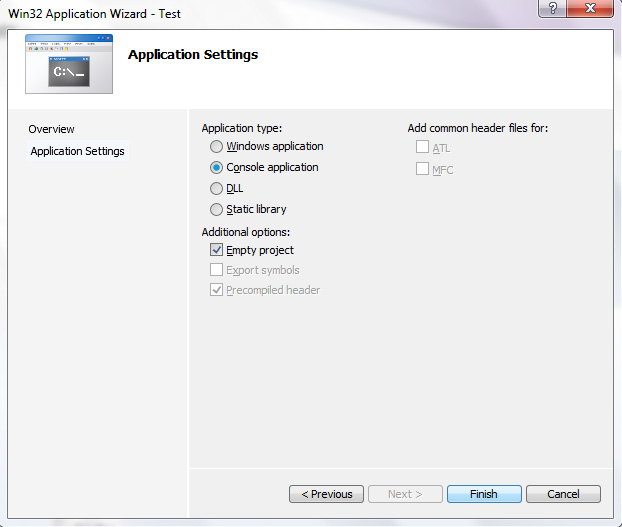
  • Click Next — select Console Application — check Empty project — click Finish.

empty-win32-console

  • Now you are done creating empty project in Visual C++.

Create New File in Visual Studio

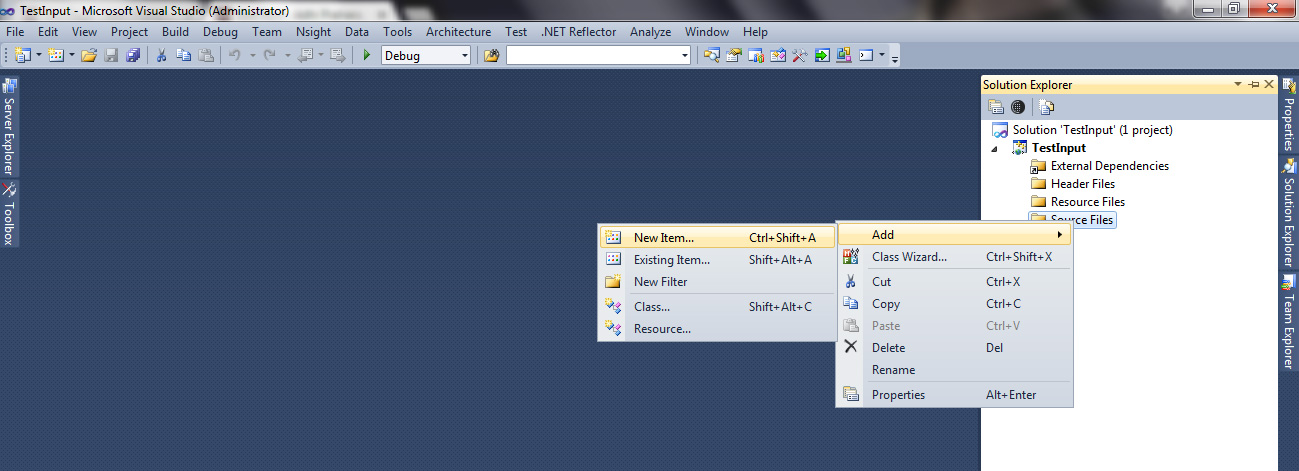
  • Go to Solution ExplorerSource Files — Right click — AddNew Item.solution-new-file
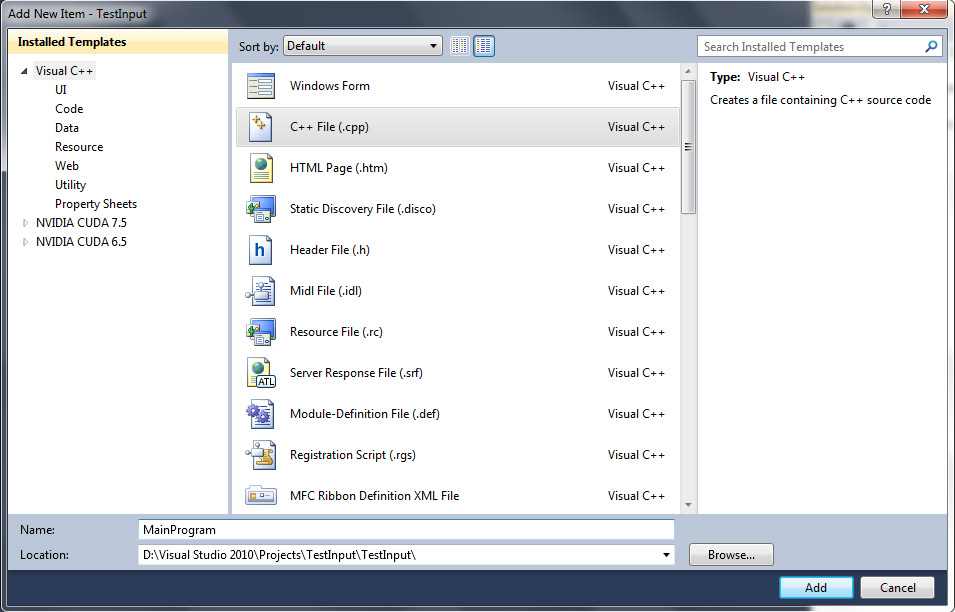
  • Select C++ File (.cpp) file then give it a name — click Add

make-cpp-file

  • Now you get a .cpp file in your project. The Source Files is a folder where you put all your .cpp / .c / .cu files and the Header Files is a folder where you put all your .h / .hpp / .cuh files

Configure Visual Studio with OpenCV

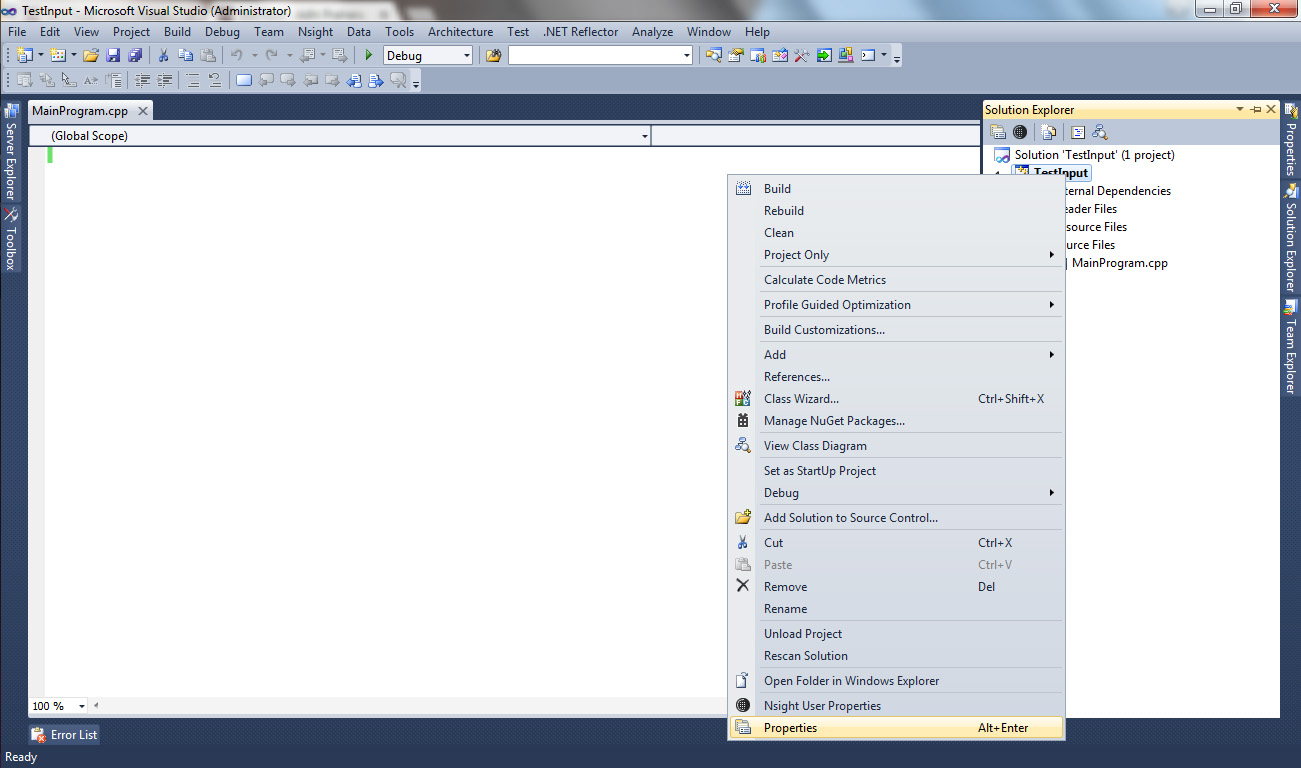
  • Go to properties of your project by right click in the project name and choose Properties.

properties-of-project

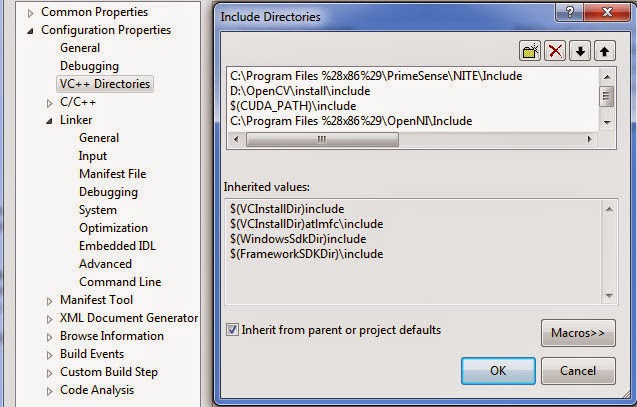
  • In VC++ DirectoriesInclude Directories, put the path of your OpenCV include directory. Do the same thing for Debug and Release mode. Here is the preview of my setting [You can ignore the PrimeSense NITE, CUDA and OpenNI path if you don’t need it] :

include-setting-openni

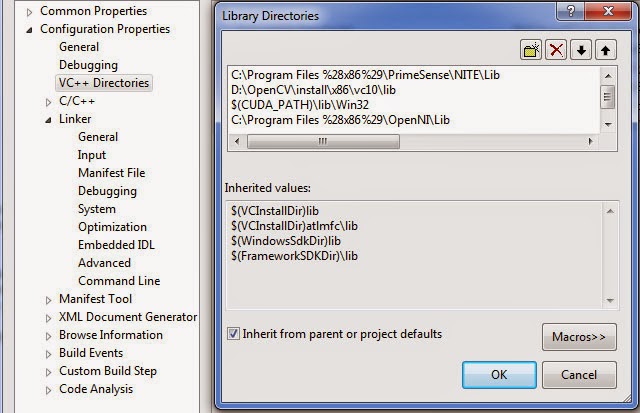
  • In VC++ DirectoriesLibrary Directories, put the path of your OpenCV library directory. Do the same thing for Debug and Release mode. Here is the preview of my setting [Again you can ignore the PrimeSense NITE, CUDA and OpenNI path if you don’t need it] :

library-setting-openni

  • In Linker Input Additional Dependencies, put all the library names from OpenCV. If you are in Debug mode then copy these OpenCV libraries [Note that this is for OpenCV 2.4.10 so if you have different version of OpenCV, just look in the path of your OpenCV library directory]:
opencv_calib3d2410d.lib
opencv_contrib2410d.lib
opencv_core2410d.lib
opencv_features2d2410d.lib
opencv_flann2410d.lib
opencv_gpu2410d.lib
opencv_highgui2410d.lib
opencv_imgproc2410d.lib
opencv_legacy2410d.lib
opencv_ml2410d.lib
opencv_nonfree2410d.lib
opencv_objdetect2410d.lib
opencv_photo2410d.lib
opencv_stitching2410d.lib
opencv_ts2410d.lib
opencv_video2410d.lib
opencv_videostab2410d.lib

If you are using CUDA and OpenNI, you need to copy these CUDA and OpenNI libraries as well [Again this is optional]:

cudart.lib
openNI.lib

If you are in Release mode then copy these OpenCV libraries [Note that this is for OpenCV 2.4.10 so if you have different version of OpenCV, just look in the path of your OpenCV library directory]:

opencv_calib3d2410.lib
opencv_contrib2410.lib
opencv_core2410.lib
opencv_features2d2410.lib
opencv_flann2410.lib
opencv_gpu2410.lib
opencv_highgui2410.lib
opencv_imgproc2410.lib
opencv_legacy2410.lib
opencv_ml2410.lib
opencv_nonfree2410.lib
opencv_objdetect2410.lib
opencv_photo2410.lib
opencv_stitching2410.lib
opencv_ts2410.lib
opencv_video2410.lib
opencv_videostab2410.lib

Again if you use CUDA and OpenNI, you need to copy these CUDA and OpenNI libraries [Again this is optional]:

cudart.lib
openNI.lib
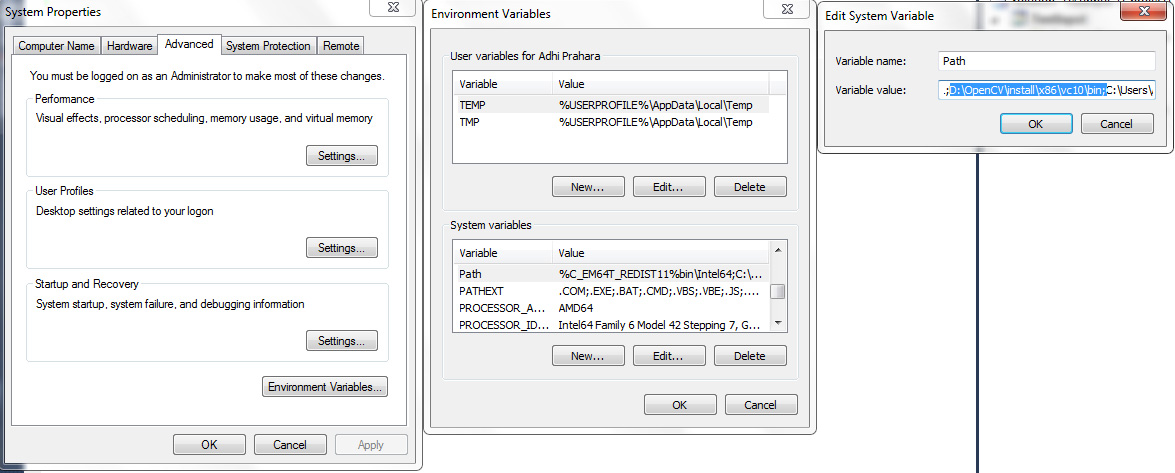
  • Last step, add OpenCV binary (bin folder) by Right click in My ComputerPropertiesAdvanced System SettingEnvironment VariablesPath — add your path to OpenCV bin folder
  • Or the simple way is just copy all the .dll inside OpenCV bin folder to your Output project (where your .exe generated).
  • Again if you use CUDA and OpenNI, you need to add their bin folder to the environment path too.

path-bin-opencv

Done! Now you are good to go to the coding step!

Visual Studio & NVidia CUDA

Computer vision get a great benefit from GPU architectures. CUDA can make image processing iteration and local stage processing more efficient. Here a simple code to access Mat from OpenCV using CUDA. With a larger image resolution, CUDA performs faster than CPU.

  • First, we need to configure Visual Studio to recognize CUDA kernel (*.cu). See this previous tutorial to add CUDA include, lib and cudart.lib.
  • After everything set, now right click Project — Build Customization — check CUDA 6.5.

  • Now make a file to your project. Just select <name>.cpp file then rename it to <name>.cu.
  • We need to set type file for .cu. Go to properties .cu file — File Type — select CUDA C++.
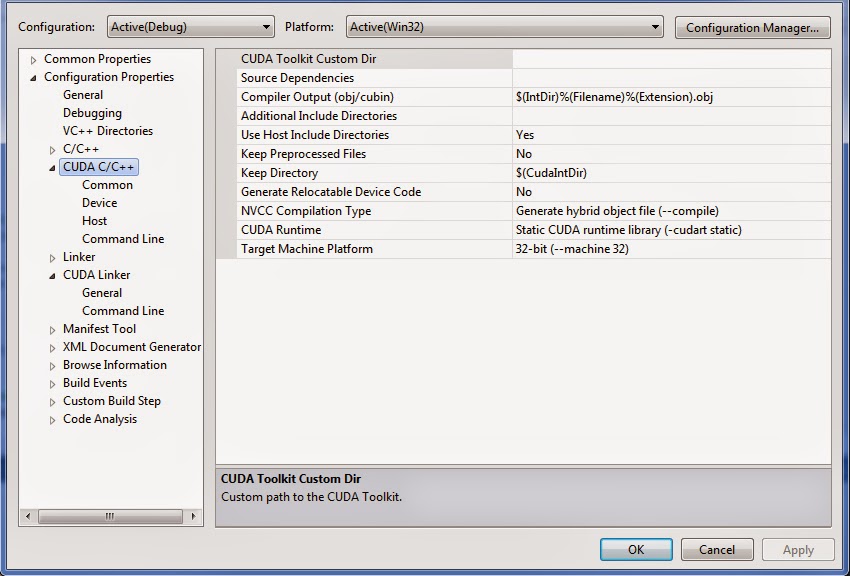
  • After you set that this option will show up on Project properties.

  • All set up, now make a header for that .cu file, just like making a header for .cpp.

We will use these header to work with CUDA and OpenCV.

#include <opencv\cv.h>
#include <opencv\highgui.h>
#include <opencv2\gpu\gpu.hpp>
#include <cuda_runtime.h>
#include <device_launch_parameters.h>

Before we use CUDA, lets check whether CUDA is available or not for our device. If this function return true then we can go on to the next code. If false, then we must buy device with CUDA support!

// Check CUDA support and device
bool CheckCUDA()
{
 int deviceCount = 0;
 cudaError_t error = cudaGetDeviceCount(&deviceCount);
 if (error == 0)
 return true;
 else
 return false;
}
Now we make a kernel inside the .cu file we made before.
// CUDA kernel that threshold a BGR image with given value, 
// ex: B = 127, G = 127, R = 127
// Result is a grayscale-mask image
// if pixel passed the threshold = 255 otherwise = 0.
__global__ void Compute(
uchar* image, // bgr image 3D
uchar* mask, // mask image 2D
int* threshold,         // threshold
int width, int height, // size image
int step3D, int step2D) // step 2D and 3D
{
// calculate index coordinate x,y
const int xIndex = threadIdx.x + blockIdx.x * blockDim.x;
const int yIndex = threadIdx.y + blockIdx.y * blockDim.y;
// a rule so index never goes out of bound
if ((xIndex < width) && (yIndex < height))
{
// calculate index for color and gray step
const int colorIdx = yIndex * step3D + (3 * xIndex);
const int grayIdx  = yIndex * step2D + xIndex;
// initialize mask to zero
mask[grayIdx] = static_cast<uchar>(0);
// get value per channel
const int blue = static_cast<int>(image[colorIdx + 0] );
const int green = static_cast<int>(image[colorIdx + 1]);
const int red = static_cast<int>(image[colorIdx + 2]);
// begin thresholding
if (blue > threshold[0] && green > threshold[1] && red > threshold[2])
mask[grayIdx] = static_cast<uchar>(255);
}
}

This is how we call that kernel in our main program. Assume we already have an image store in Mat image.

Mat image;              // image data that store in Mat
Mat mask;               // mask image result after thresholding
// define the threshold
int* thresh = new int[3];
thresh[0] = 127; thresh[1] = 127; thresh[2] = 127;
 
int* dThresh;     // threshold data
uchar* dImage;    // pointer image data
uchar* dMask;     // pointer mask data
dim3 blockD; // BlockDim for CUDA : Number of thread per block
dim3 gridD; // GridDim for CUDA  : Number of block per grid
intSize;          // size for int data
int colorSize; // size for UINT8 3D array
int graySize; // size for UINT8 2D array
 
// Initialize threshold , 3D image color and 2D image color size
cvtColor(image, mask, CV_BGR2GRAY);
intSize = 3 * sizeof(int);
colorSize = image.rows * image.step;
graySize = mask.rows * mask.step;
 
// Define block size and grid size
blockD = dim3(32, 32);
gridD = dim3(image.cols / blockD.x, image.rows / blockD.y);
 
// Create allocation memory to store threshold, image and mask data
cudaMalloc((void**)&dThresh, intSize);
cudaMalloc((void**)&dImage, colorSize);
cudaMalloc((void**)&dMask, graySize);
 
// Copy threshold data and image data from CPU to GPU
cudaMemcpy(dThresh, thresh, intSize, cudaMemcpyHostToDevice);
cudaMemcpy(dImage, image.ptr(), colorSize, cudaMemcpyHostToDevice);
// Compute threshold with kernel
Compute<<<gridD, blockD>>>(
dImage, dMask, dThresh,
image.cols, image.rows, image.step, mask.step);
// download result mask from GPU to CPU
cudaMemcpy(mask.ptr(), dMask, graySize, cudaMemcpyDeviceToHost);// show mask
imshow(“ThresholdBox”, mask);
waitKey(0); 

That is it!

Image Processing : Build OpenCV with GPU Support

There are lots of library for computer vision but I choose to use OpenCV. You can get OpenCV anywhere just google it. You can choose easy install (the .exe one) or build from source. I prefer .exe one but there is a problem, it is not support GPU. So we need to compile OpenCV 2.4.10 myself. You must have NVidia driver that support CUDA and Visual Studio 2010 or later. Fortunately, my notebook has GeForce GT540M 2GB.

Here is the step:

  • Download and install OpenCV 2.4.10 source from OpenCV website. If you already download the .exe then extract it, look at the installation folder there are folder called source. You can use that to build OpenCV just like I did.
  • Download and install CMake, I use CMake 3.1.0.
  • Download and install NVidia CUDA Toolkit 6.5 from NVidia website.
  • Download and install OpenGL, OPENNI and TBB.
  • Download Python from Python website.

Now your preparation is completed, the rest are the installation steps.


How to build OpenCV with GPU support?

First you need to configure CMake. Here is the steps :

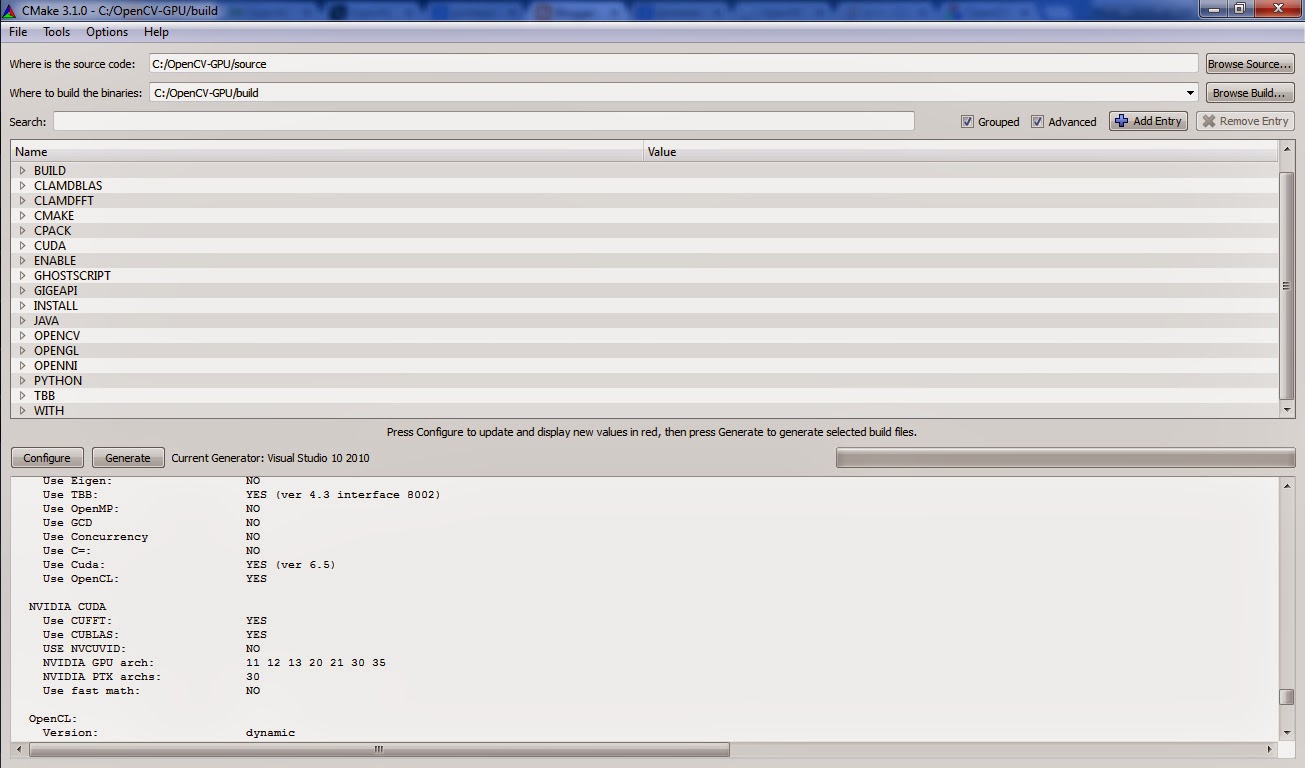
  • Open CMake and set CMake source to OpenCV source location.
  • Set CMake build to empty folder where you build the source.
  • Check the grouped and advanced checkbox. The setting just like this preview.

header-cmake

  • Click configure, it will redirect you to select compiler. I choose Visual Studio 2010 (32bit).
  • Select specify native compiler then click next.
  • Browse for cl.exe in Visual Studio 10.0/VC/bin/cl.exe, fill in for C and C++ compiler, click finish. You will see many red lines there but don’t be affraid you’ve done nothing wrong.

You just done configuring CMake. Now you need to change some of these configuration.

  • Leave the Ungrouped Entries, BUILD, CLAMDBLAS, CLAMDFFT, CMAKE, CPACK as it is.
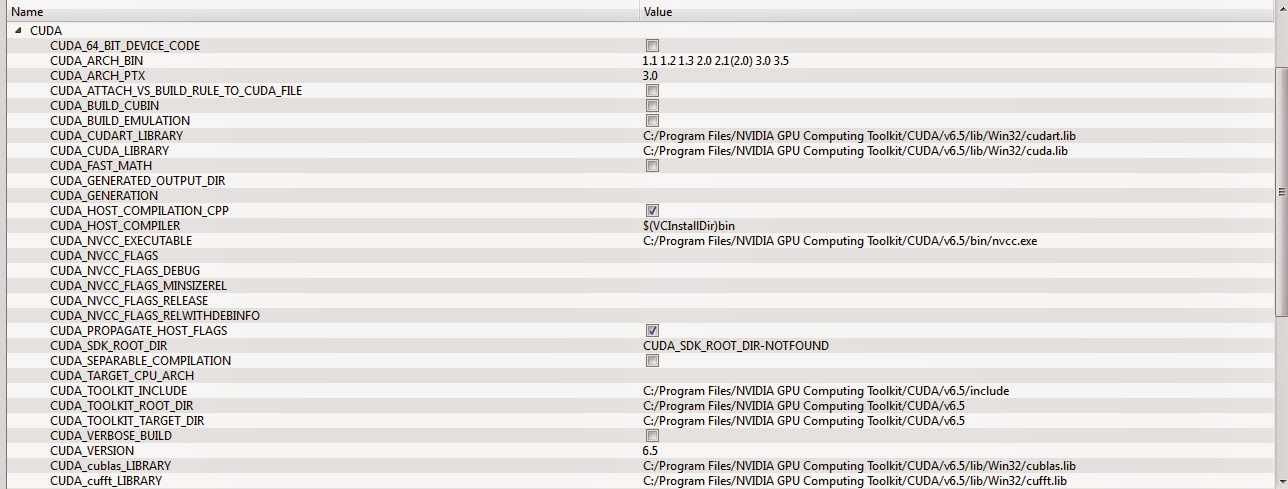
  • Expand the CUDA group, there are some entry that already checked by default but you need to unchecked CUDA_ATTACH_VS_BUILD_RULE_TO_CUDA_FILE.

cuda-body

  • Leave the ENABLE, GHOSTSCRIPT, GIGEAPI, INSTALL, JAVA, OPENCV as it is but make sure ENABLE_SOLUTION_FOLDERS checked.
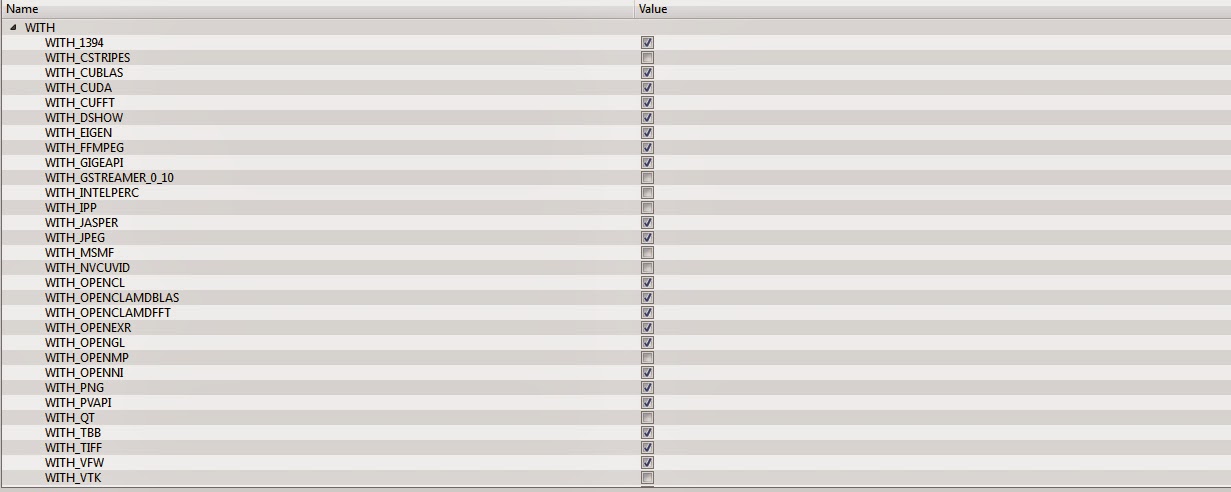
  • Expand the WITH group, there are some entry that already checked by default. You need to check WITH_CUBLAS, WITH_CUDA, WITH_OPENGL, WITH_OPENNI, WITH_TBB.

body-with

  • Click configure to update the configuration.
  • Expand the OPENGL, OPENNI, PYTHON and TBB group. You need to fix the location of NOT-FOUND folder such as include and libs folder to their right path where you install them.

body-other

  • After every folder path / location correct, click configure to update the configuration.
  • Now you should not see any red lines left like this preview. If you still seeing red lines just check it and fix the wrong path until it is right.

body-cmake


Build OpenCV

  • Click generate and wait the process to finish.
  • Go to the build folder you’ve created before, look for OpenCV.sln.
  • Open it on Visual Studio and set to VS2010 to Debug mode.
  • This solution contain many projects just select project with name ALL_BUILD then click build. It will build all the project for you.
  • Just click NO if pops up from Visual Studio appeared.
  • Take a coffee because it will take long time to finish and hopefully without any errors.
  • After all build done without error, select project named INSTALL then build it.
  • That will generate install folder in build folder that contain necessary include, bin and lib folder for your OpenCV project.
  • Do the same for Release mode.

Now, you finish all the hard work and you have compiled OpenCV with GPU support.

File System (Extension) : Final Assignment

File System (Extension) : Final Assignment

Given Date : December 26th, 2015

Due Date : December 31st, 2015

Info :

  • Final assignment for section 14 (individual task)
  • Sent your work to my email adhi.prahara@tif.uad.ac.id before due date

Questions :

  1. Why hash function can be used for security ?
  2. Mention some secure hash function !
  3. Give a review of SHA and MD5 ! (minimum 3 paragraph)